반응형

핀란드는 학생한테 많은 할인을 해준다. 

나도 대학생이라 나름 할인을 받아보려 했지만

국제 학생증이 없어 .. 할인을 못받았다. 


학생증 없이 일반으로 학식을 먹으려면 약 6.9유로

학생증이 있으면 약 2.7유로


약 4000원 정도에 먹을 수 있다...


와 핀란드에서 4000원에 먹을 수 있다. 


https://www.isic.co.kr/home/index.jsp


국제학생증 ISIC

국제학생증 ISIC 학생할인정보·항공권·교통패스·보험·다국적투어

www.isic.co.kr

나는 해외에서 발급 받았는데

요기서 신청하면된다. 


신청방법은 재학증명서를 받아 신청비 2만원 정도를 내면 

나는 한국시간 기준으로 하루정도 만애 발급 받았다.


그리고 안드로이드 및 애플 어플로

isic 카드를 신청하면 된다. 


그럼 어플로 카드를 직원한테 보여주면 할인이 된다 !


읭 이거는 학식사진


넘나 맛있엇다.


그리고 오늘은 안나왔는데 김치가 있어서 너무 웃겼다.


핀란드 인들은 나름? 김치를 잘먹는다.. 


국뽕이 차오른다.. 


반응형
반응형

오늘은 이런 썸네일형 게시판을 만들어 보려고한다. 

삽질을 했지만 이해를 한 것 같아 포스팅을 해본다. 


일단 부트스트랩을 이용하였다.


뷰 부터 보자 


        <h1>NEWS AND PRESS RELEASES</h1>
        
        			   <form action="<c:url value='/news/newsList'/>">
                        <div class="search-wrap clearfix">
                            <button type="submit" class="btn btn-primary search-btn" style="margin-right: 24%;">검색</button>
                            <input type="text" name="keyword" class="form-control search-input" value="${pc.paging.keyword}"
                            style="width: 200px; ">
                            <select class="form-control" id="search-select" name="condition" style="width: 80px; margin-left: 54%">
                                <option value="Vboard_title" ${pc.paging.condition == 'vboard_title' ? 'selected' : ''}>제목</option>
                                <option value="Vboard_content" ${pc.paging.condition == 'vboard_content' ? 'selected' : ''}>내용</option>
                                <option value="Vboard_writer" ${pc.paging.condition == 'vboard_writer' ? 'selected' : ''}>작성자</option>
                            </select>
                        </div>
                    </form> 
        
        <div class="row">
         <c:forEach var="vo" items="${newsList}">
          <div class="col">
          <a href="<c:url value='/news/newsDetail?Vboard_no=${vo.vboard_no}'/>">
                <div class="card" style="width: 18rem;">
                <img src="<c:url value='/news/display?fileloca=${vo.fileloca}&filename=${vo.filename}'/>" class="card-img-top" alt="..." style="height: 10rem;">
                <div class="card-body">
                  <h5 class="card-title">Title : ${vo.vboard_title}</h5>
                  <p class="card-text"> Writer : ${vo.vboard_writer}</p>
                  <p class="card-text"> Date : ${vo.vboard_Regdate}</p>
                </div>
                
          </a>

              </div>
          </div>
           </c:forEach>

원래는 테이블로 썻지만 div로 해서 카드뉴스 형식으로 만들어 보았습니다. 


모델 객체


public class VboardVO {
	
	private int Vboard_no;
	private String Vboard_title;
	private String Vboard_writer;
	private String Vboard_content;
	private int Vboard_hit;
	private int Vboard_like;
	private int Vboard_type;
	private Timestamp Vboard_Regdate;
	private String filename;
	private String fileloca;
	private String filerealname;
	private String uploadpath;
	private String file;
}


이렇게 평범한 VO객체를 하나 만들어 준다.


여기서 중요한건 파일경로 등등을 설정해준다. 


그리고 insert를 해준다. 


insert를 해줄때는 반드시 


 <form action="<c:url value='/news/newsInsert'/>" method="post" enctype="multipart/form-data">
        <div class="mb-3" style="width: 50%; margin: 0 auto;">
            <label for="exampleFormControlInput1" class="form-label">News Title</label>
            <input type="email" class="form-control" id="exampleFormControlInput1" name="Vboard_title">
          </div>
          <div class="mb-3" style="width: 50%; margin: 0 auto;">
            <label for="exampleFormControlInput1" class="form-label">News Witer</label>
            <input type="email" class="form-control" id="exampleFormControlInput1" name="Vboard_writer">
          </div>
          <div class="mb-3" style="width: 50%; margin: 0 auto;">
            <label for="exampleFormControlTextarea1" class="form-label">News Content</label>
            <textarea class="form-control" id="ckeditor" rows="3" name="Vboard_content"></textarea>
          </div>
          <div class="mb-3" style="width: 50%; margin: 0 auto;">
            <label for="formFileMultiple" class="form-label">썸네일</label>
            <input class="form-control" type="file" id="formFileMultiple" name="file1">
          </div>
 			
 			<input type="hidden" value="0" name="Vboard_type">
          <button type="button" class="btn btn-primary whyBtn">글 작성</button>
          <button type="button" class="btn btn-primary CancleBtn">취 &nbsp; 소</button>
    </form>

enctype="multipart/form-data

으로 데이터를 넘겨줘야 한다. 


그 다음 컨트롤러로 넘겨준다. 


@PostMapping("/newsInsert")
	public String newsInsert(@RequestParam("file1") MultipartFile file , VboardVO vo , HttpServletRequest req, HttpServletResponse resp) {
		try {
		SimpleDateFormat sdf = new SimpleDateFormat("yyyyMMdd");
		Date date = new Date();
		String fileLoca = sdf.format(date);
		
		String uploadPath = req.getSession().getServletContext().getRealPath("/resources/images/thumbnail");
		
		System.out.println();
		File folder = new File(uploadPath);
		if(!folder.exists()) {
			folder.mkdir();
		}
		
		String fileRealName = file.getOriginalFilename();
		
		UUID uuid = UUID.randomUUID();
		String uuids = uuid.toString().replaceAll("-", "");
		
		String fileExtension = fileRealName.substring(fileRealName.indexOf("."), fileRealName.length());
		String fileName = uuids + fileExtension
		
		File saveFile = new File(uploadPath + "\\" + fileName);
	
			file.transferTo(saveFile);
			
			VboardVO Vvo = new VboardVO(0,vo.getVboard_title(),vo.getVboard_writer(), vo.getVboard_content() , 0, 0, vo.getVboard_type(), null, fileName, fileLoca, fileRealName, uploadPath, null);
			
				service.newsInsert(Vvo);

			} catch (IllegalStateException | IOException e) {
			e.printStackTrace();
		}
		
		
		//service.newsInsert(vo);
		return "redirect:/news/newsList";
	}

우선 ex) 20220406 이런식으로 파일명을 만들어 주기 위해 심플데이트포멧으로 이름을 생성해주고

데이트 객체를 생성해준다. 

그 뒤 리퀘스트객체를 잉 이용하여 패스를 선언해준다. 


폴더를 생성 해 준뒤 

uuid를 생성하여 파일명이 겹치지 않게 설정해준다. 


그 뒤  savefile을 이용하여 파일을 uploadpath와 filename으로 저장해준다. 


그리고 vo객체를 하나 생성해준다. 


그리고 insert를 시켜주면 


이런식으로 파일경로나 이름들이 잘 들어오는걸 알 수 있다. 


그리고 이제 display 메소드를 만들어 주어야한다. 


@GetMapping("/display")
	public ResponseEntity<byte[]> getFile(String fileloca, String filename , HttpServletRequest req, HttpServletResponse resp){
		
		File file = new File(req.getSession().getServletContext().getRealPath("/resources/images/thumbnail"+ "\\" + filename));
		
		ResponseEntity<byte[]> result = null;
		
		try {
		HttpHeaders headers = new HttpHeaders();
	
			headers.add("Content-Type", Files.probeContentType(file.toPath()));
			result = new ResponseEntity<>(FileCopyUtils.copyToByteArray(file), headers, HttpStatus.OK);
		} catch (IOException e) {
			e.printStackTrace();
		}


		return result;
	}

이렇게 파일 경로를 선언해주면 된다. 


 <img src="<c:url value='/news/display?fileloca=${vo.fileloca}&filename=${vo.filename}'/>" class="card-img-top" alt="..." style="height: 10rem;">

이렇게 getMapping으로 진행해주면 끝이 나게 된다. 


이렇게 완성하면 끝이 난다. 


https://github.com/MoonSeokHyun

반응형
반응형


이번에는 회원관리에 대해서 만드는법을 살펴보자 


요기 위에 보이는 승인 거절회원 , 추방회원 가입 승인 이렇게 구분되어있다.


시나리오는 이렇다

1) 가입을 처음하게 되면 로그인이 되지않는다. 

2) 관리자가 승인을 해줘야 로그인이 된다.

3) 관리자가 승인 거절을 하게 되어 로그인이 안된다.

4) 회원 추방을 한다. 로그인이 안된다. 


즉 2번을 제외하고는 로그인이 안되게 막으려고 한다. 


그렇게 하려면 

우선 오라클에서 TYPE으로 나누려고 한다.

0 - 대기

1 - 승인

2 - 거절 

3 - 추방 


이렇게 4가지 카테고리로 묶으려고 한다. 


우선 뷰부터 보자 


 <div class="member_list" >
        <table class="admin_board_wrap" id="user-admin">
          <thead class="admin_boardList">
            <th class="admin_board_head">이름</th>
            <th class="admin_board_head">아이디</th>
            <th class="admin_board_head">현재상태</th>
            <th class="admin_board_head">가입일</th>
            <th class="admin_board_head">게시글수</th>
            <th class="admin_board_head">댓글수</th>
            <th class="admin_board_head">가입승인</th>
          </thead>
          <tbody>
          <c:forEach var="vo" items="${userInfo}">
            <tr class="admin_board_content">
              <td class="admin_board_content_nm"><a class="mypageModal user_id" value="${vo.userId}">${vo.userId}</a> </td>
              <td class="admin_board_content_nm">${vo.userName}</td>
              <td class="admin_board_content_nm">
              			<c:choose>
              				<c:when test="${vo.userStatus== 0}">취업준비생</c:when>
              				<c:when test="${vo.userStatus== 1}">직장인</c:when>
              			</c:choose>	
              </td>
              <td class="admin_board_content_nm">${vo.userDate}</td>
              <td class="admin_board_content_nm"><a href="#" class="modal_boardList_admin" data-user-id ="${vo.userId}">${vo.boardCnt}</a></td>
              <td class="admin_board_content_nm"><a href="#" class="modal_reply_admin" data-user-id ="${vo.userId}">${vo.commentCnt}</a></td>
			  <c:choose>
			  	<c:when test="${vo.userPass == 0}">
			  	<td class="admin_board_content_nm">
	                <button data-user-id ="${vo.userId}" type="button" value="승인" class="appro">승인 </button>
	                <button data-user-id ="${vo.userId}" type="button" value="거부" class="deni">거부</button>
                </td>
			  	</c:when>
			  	<c:when test="${vo.userPass == 1}">
			  	<td class="admin_board_content_nm">
	                <button data-user-id ="${vo.userId}" type="button" value="승인" class="userDrop">회원 추방</button>
                </td>
			  	</c:when>
			  	<c:when test="${vo.userPass == 3}">
			  	 	<td>추방회원</td>
			  	</c:when>
			  	<c:when test="${vo.userPass == 2 }">
			  		<td>승인거절회원</td>
			  	</c:when>
			  </c:choose>
            </tr>
            </c:forEach>
          </tbody>
        </table>


우선 c:fi로 위에서 정한대로 0 부터 3까지 보여준다. 


그다음에 ajax로 컨트롤러로 바꿔준다. 


      $('.appro').click(function(){
      	const successId = $(this).data("userId");
    	console.log(successId);
    	// 0 가입대기 , 1.가입승인, 2. 가입거절
    	
    	$.ajax({
    		type : 'post',
    		url : '<c:url value="/admin/successId" />',
    		data : {
        		id : successId,
        	},
        	success : function(data){
        	},error : function(status, error) {
				console.log('에러발생!!');

				console.log(status, error);
			}
        	
    	}); // 아작스 종료
      $('.modal_approve').fadeIn(500);
      });

      // 가입거부 버튼 클릭시 요청 삭제
      $('.deni').click(function(){
        console.log('회원가입거부!');
        // 가입승인 거부됨 메일전송 서비스 만들면 좋을듯
      });
      
      $('.userDrop').click(function() {
		
    	  const dropId = $(this).data("userId");
        	console.log(dropId);
           	$.ajax({
        		type : 'post',
        		url : '<c:url value="/admin/dropId" />',
        		data : {
            		id : dropId,
            	},
            	success : function(data){
            	},error : function(status, error) {
      				console.log('에러발생!!');
      				
      				console.log(status, error);
      			}
  		}); //end ajax

승인아나 추방 버튼을 누르면 

data-id로 아이디를 끌고 온후 

ajax를 동작시킨다. 


컨트롤러를 보자 


	@ResponseBody
	@PostMapping("/dropId")
	public void dropID(String id) {
		UserService.dropUser(id);
	}
    
    	@ResponseBody
	@PostMapping("/successId")
	public void successId(String id) {
		System.out.println(id);
		System.out.println("open! user sign success Id ajax!");
		UserService.successId(id);
	}
	
	@ResponseBody
	@PostMapping("/failId")
	public void failId(String id) {
		System.out.println(id);
		System.out.println("open! user sign failId Id ajax!");
		UserService.failed(id);
	}

이렇게 한 뒤 매퍼를 보자

   <!-- 가입 승인 -->
   <update id="successId">
      UPDATE user_info
      SET user_pass = 1
      WHERE user_id = #{id}
   </update>
   <!-- 가입 승인 -->
   <update id="failed">
      UPDATE user_info
      SET user_pass = 2
      WHERE user_id = #{id}
   </update>
   <!-- 회원 드롭 -->
      <update id="dropUser">
      UPDATE user_info
      SET user_pass = 3
      WHERE user_id = #{id}
   </update>

이렇게 user_pass를 정해준다. 


그럼 가입 승인을 누르면 1로 변경되고

거정을 누르면 2번이되고

추방을 누르면 3번이 된다. 


이제 로그인을 막아보자


    // 메인 로그인 페이지 빈값확인
      $('.aside_login_btn').click(function(){
        if($('.asideId').val() === ''){
            alert('아이디를 입력하세요.');        
            console.log('아이디를 입력하세요.');
            $('.asideId').focus();
            return;
        } else if($('.asidePw').val() === ''){
            alert('비밀번호를 입력하세요.');
            $('.asidePw').focus();
            return;
        } else {
        	console.log('id, pw 모두 입력함')
           //$('.loginForm').submit(); //ajax로 추후 처리 예정
				console.log('id:'+$('.asideId').val());
				console.log('pw:'+$('.asidePw').val());
				const userId = $('.asideId').val();
			    const userPw = $('.asidePw').val();
			    const userInfo = {"userId":userId, "userPw":userPw};
          $.ajax({
			type : 'post',
			url : '<c:url value="/user/userLogin" />',
			data : JSON.stringify(userInfo),
			dataType:"text",
			contentType : "application/json; charset=UTF-8",
			success : function(data) {
				//checkInput.attr('disabled', false);
				//code = data;
				//console.log(rs);
				if(data === 'idFail'){
					alert('존재하지 않는 회원입니다!');
					//$('.loginForm').submit();
					console.log('db에 존재하지 않는 회원');
				} else if (data === 'pwFail'){
					alert('비밀번호가 틀렸습니다');
					console.log('db에 존재하는 회원, 비번틀림');
				} else if (data === 'wait'){
					alert('가입 승인 중 입니다. 잠시만 기다려 주세요');
				}else if (data === "refusal"){
					alert('가입이 거절 되었습니다.')
				}else if(data === "drop"){
					alert(userId+'님은 로그인 제제 상태입니다. 관리자에게 문의 해주세요.')
				}else {
					alert(userId+'님 반갑습니다.');
					console.log('db에 존재하는 회원, 로긘 성공');
					location.href='/SHY/';
				}
			},
			error : function(status, error) {
				console.log('에러발생!!');
				console.log(userInfo);
				console.log(status, error);
			}
		});

우선 로그인 하는 ajax를 해보자


컨트롤러를 확인해보자

	//로그인
		@ResponseBody
		@PostMapping("/userLogin")
		public String userLogin(@RequestBody UserVO vo, HttpSession session) {
			System.out.println("userLogin post");
			System.out.println("갖고온 param: " + vo.getUserId());
			
			BCryptPasswordEncoder encoder = new BCryptPasswordEncoder();
			System.out.println(encoder.toString());
			UserVO dbData = service.getInfo(vo.getUserId());
			// 2022 03 27 석현 추가 
			if(dbData.getUserPass() == 0) {
				return "wait";
			}else if(dbData.getUserPass() == 2){
				return "refusal";
			}else if(dbData.getUserPass() == 3){
				return "drop";
			}
			
			if(dbData != null) {
				if(encoder.matches(vo.getUserPw(), dbData.getUserPw())) {
					//로그인 성공 회원을 대상으로 세션 정보를 생성
					session.setAttribute("login", dbData);
					return "loginSuccess";
					
				} else {
					return "pwFail";
				}

			} else {
				return "idFail";
			}


우선 user에 대한 세션을 만들어 주고 

user_pass가 0부터 3까지 확인해준다

그다음에 특정 단어를 리턴시켜준다. 


그다음


			if(data === 'idFail'){
					alert('존재하지 않는 회원입니다!');
					//$('.loginForm').submit();
					console.log('db에 존재하지 않는 회원');
				} else if (data === 'pwFail'){
					alert('비밀번호가 틀렸습니다');
					console.log('db에 존재하는 회원, 비번틀림');
				} else if (data === 'wait'){
					alert('가입 승인 중 입니다. 잠시만 기다려 주세요');
				}else if (data === "refusal"){
					alert('가입이 거절 되었습니다.')
				}else if(data === "drop"){
					alert(userId+'님은 로그인 제제 상태입니다. 관리자에게 문의 해주세요.')
				}else {
					alert(userId+'님 반갑습니다.');
					console.log('db에 존재하는 회원, 로긘 성공');
					location.href='/SHY/';
				}

이렇게 막아준다. 


이제 동작해보자 


처음 가입하면 관리자 페이지에 이렇게 승인 거부가 뜬다


승인을 하면 회원 추방버튼이 생긴다. 


로그인이 잘되는걸 알수있다.


이제 추방을 눌러보자


이렇게 추방회원이라고 못 박혀 나온다. 


로그인을 해보자 


라고 나온다. 


이상 포스팅 끝! 


https://github.com/MoonSeokHyun

반응형
반응형

몇일전 김치가 떨어져 배추를 사러 헬싱키에 있는 한인마트에 갔다.
그런데 .. 배추의 상태가 다 쓰레기 며 상태가 좋지 못했다.
그래서 생각을 해보니 집에 떡볶이 하다 남은 양배추가 있엇다.

그래서 나는 폭풍 검색을 했다 구글에
구글에 검색을 하니 양배추로 김치를 만들어도 맛있다는게 아닌가?

그래서 한번 만들어 봤다.

재료소개
1) 양배추
2) 대파
3) 다진마늘
4) 고추가루
5) 쌀가루
6) 설탕
7) 간장
8) 소금

정말 간단하다.

1) 대파와 양배추를 소금물에 절인다 (약 1시간)

생 대파도 소금물에 절이면 부들부들 해지더라.


2) 양념을 만들어준다.

고추가루 3스푼 크게
간장 종이컵으로 반컵
설탕 2스푼 좀 작게

이렇게 해서 섞어주면 생각보다 달콤한 소스가 완성된다.

이대로 먹어도 괜찮지만
발효를 위해

쌀가루로 풀을 만들어준다.

요론식으로 슬라임의 형태를 띄지만 괜찮다
식혔다가 이제 기존 양념과 섞어 준다.


그리고 아까 다져둔 다진 마늘을 넣고 섞어준다

그럼 걸쭉한 김치 소스가 완성된다.


절여둔 양배추에 물을 빼고 섞어준다.


마무리로 통깨를 뿌려 마무리한다.

핀란드 생활을 한지 벌써 3주 째지만
정말 신기한건
헬싱키 한인마트에서 왠만한걸 다 판다는 것이다.
그리고 비건 레시피가 생각보다 그렇게 어렵지 않다는 걸 깨달았다.

빨리 비건사이트를 만들어 배포해고고싶다.


반응형
반응형

게시판이 있는 사이트 라면 꼭 있는 기능중에 하나인 

좋아요 기능을 만들어 보려고 한다. 


좋아요는 한 게시글당 하나만 누를 수 있으면 누를 경우 

좋아요 취소로 바뀌게 된다. 


시작 해보자 .


좋아요 및 취소 기능


우선 테이블을 만들자.


/*
 	create table vegan_like(
	like_no int(30) AUTO_INCREMENT PRIMARY KEY not null,
    board_no int(30),
    user_no int(30),
    likeNum int(5)
);
 */

나는 따로 테이블을 생성했다. 


그 후 VO 객체를 하나 만들어 준다. 


@Getter
@Setter
@ToString
public class LikeVO {
	private int like_no;
	private int board_no;
	private String user_no;
	private int freeboard_like;

먼저 해야 할 것은 

해당 게시글에 좋아요를 눌렀는가? 안눌렀는가? 부터 알아야 한다. 


그래서 매퍼에 쿼리문을 작성했다. 

	<!-- 좋아요 눌럿는지 안눌럿는지 -->
	<select id="findLike" resultType="int">
		select count(*) from vegan_like where board_no = #{board_no} and user_no = #{user_no}
	</select>

이렇게 하면 1또는 0이 오는데 1이 오면 좋아요 취소를 보여주고 0이면 좋아요를 보여주면 된다. 


//	상세보기
	@GetMapping("/freeDetail")
	public void freeDetail(int freeboard_no, String user_id,Model model) {
		
		System.out.println("상세보기 페이지");
		model.addAttribute("Detail", service.freeDetail(freeboard_no));
		
		LikeVO like = new LikeVO();
		
		like.setBoard_no(freeboard_no);
		like.setUser_no(user_id);
		
		model.addAttribute("like", service.findLike(freeboard_no, user_id));
		model.addAttribute("getLike", service.getLike(freeboard_no));
		service.hit(freeboard_no);


	}

기존 상세보기에서 likevo 객체를 선언해주고 

getlke로 메퍼에서 오는 값을 모델로 뷰로 던져준다.  


이때 유저 아이디와 글 번호를 받게 된다. 


var likeval = ${like};
		
		let board_no = ${Detail.freeboard_no};
		let user_no = '${login.user_id}';
		if(likeval > 0){
			console.log(likeval + "좋아요 누름");
			$('.LikeBtn').html("좋아요 취소");
			$('.LikeBtn').click(function() {
				$.ajax({
					type :'post',
					url : '<c:url value ="/FreeBoard/likeDown"/>',
					contentType: 'application/json',
					data : JSON.stringify(
							{
								"board_no" : board_no,
								"user_no" : user_no
							}		
						),
					success : function(data) {
						alert('취소 성공');
					}
				})// 아작스 끝
			})

		}else{
			console.log(likeval + "좋아요 안누름")
			console.log(user_no);
			$('.LikeBtn').click(function() {
				$.ajax({
					type :'post',
					url : '<c:url value ="/FreeBoard/likeUp"/>',
					contentType: 'application/json',
					data : JSON.stringify(
							{
								"board_no" : board_no,
								"user_no" : user_no
							}		
						),
					success : function(data) {
						alert('성공염');
					}
				})// 아작스 끝
			})

일단 모든 자바스크립트를 보여주었지만 위에 언급한대로 

0이 오면 좋아요 버튼을

1이 오면 좋아요 취소 버튼을 보여주고 

그에 따라 동작 하게 하면 된다. 


이제 좋아요를 구현해보자 


먼저 매퍼 부터 구현하자. 


	<insert id="likeUp">
		insert into vegan_like (like_no ,board_no , user_no, freeboard_like)
		values((select * from (select max(like_no)+1 from vegan_like) next), #{board_no},#{user_no},1)
	</insert>

이렇게 인서트로 좋아요 버튼을 누르면 1을 눌러 좋아요를 카운트 업을 시켜준다. 


반대로 취소는 


	  <delete id="likeDown">
	  	delete from vegan_like where board_no = #{board_no} and user_no = #{user_no} 
	  </delete>

딜리트 이다. 


컨트롤러를 보자 


	@ResponseBody 
	@PostMapping("/likeUp")
	public void likeup(@RequestBody LikeVO vo) {
		System.out.println("컨트롤러 연결 성공");
		System.out.println(vo.getBoard_no());
		System.out.println(vo.getUser_no());
		service.likeUp(vo.getBoard_no(), vo.getUser_no());
	
	}
	
	@ResponseBody
	@PostMapping("/likeDown")
	public void likeDown(@RequestBody LikeVO vo) {
		System.out.println("좋아요 싫어요!");
		service.likeDown(vo.getBoard_no(), vo.getUser_no());
	}

좋아요 싫어요 모두 같은 코드가서 딱히 설명한 것이 없다. 


이렇게 코드를 짜면 대략 좋아요 기능이 완성 되었을 것이다. 


좋아요 버튼을 누르면 


이렇게 좋아요 카운트가 올라가고 좋아요 취소버튼으로 바뀐다.

그 후 좋아요 취소 버튼을 누르면  

다시 기존대로 변경된다. 


댓글 및 조아요 제목에 보이기


이제 메인에 좋아요를 뿌려보자 


우선 매퍼를 수정해주자 

기존 리스트 매퍼에서 

스칼라 서브쿼리를 이용하여 좋아요 및 댓글 수를 카운트 해보자 


     <select id="getFreeBoard" resultType="com.vegan.recipe.freeBoard.freeboardVO">

     	select *,
     	(select count(*) from vegan_comment where bno = v.freeboard_no) as com_cnt,
		(select count(*) from vegan_like where board_no = v.freeboard_no) as like_cnt
     	 from Vegan_freeBoard  v
     	<include refid="search" />
     	order by freeboard_no desc
     	limit #{pagecnt} ,  #{countPerPage}

     	
     </select>

서브 쿼리로 댓글 개수는 com_cnt

좋아요 개수는 like_cnt로 선언 했다.


그리고 boardVO객체에 위에 cnt들을 추가 해주자 

	private int freeboard_no;
	private String freeboard_title;
	private String freeboard_writer;
	private String freeboard_content;
	private int freeboard_hit;
	private int freeboard_like;
	private String uploadpath;
	private String fileloca;
	private String filename;
	private String ilerealname; // 파일리얼네임
	private Timestamp freeboard_regDate;
	private int com_cnt;
	private int like_cnt;

추가 됫다. 


그후 컨트롤러는 이미 뿌려주고 있으니 생략하지만 코드를 봐보자


	@GetMapping("/freeList")
	public String getFree(Model model, PageVO vo) {
		System.out.println("자유 게시판으로 이동");
		System.out.println("검색어" + vo.getKeyword());
		System.out.println("검색조건" + vo.getCondition());
		
		PageCreate pc = new PageCreate();
		pc.setPaging(vo);
		pc.setArticleTotalCount(service.getTotal(vo));
		
		System.out.println(pc);
		vo.setPagecnt((vo.getPageNum()-1) * vo.getCountPerPage());
		model.addAttribute("freeList", service.getFreeBoard(vo));
		model.addAttribute("pc", pc);
		
		return "FreeBoard/freeList";
	}
//	글쓰기페이

이제 freeList라는 이름으로 jsp에 뿌려주면 된다. 


        <c:forEach var="vo" items="${freeList}">
          <tr>
          	<th scope="row">${vo.freeboard_no}</th>
            <td><a href="<c:url value='/FreeBoard/freeDetail?freeboard_no=${vo.freeboard_no}&user_id=${login.user_id}'/>">${vo.freeboard_title} (${vo.com_cnt})</a></td>
            <td>${vo.freeboard_writer}</td>
            <td>${vo.freeboard_regDate}</td>
            <td>${vo.freeboard_hit}</td>
            <td>${vo.like_cnt}</td>
          </tr>
         </c:forEach>
        </tbody>

이렇게 완성 되었다. 


오늘의 포스팅 끝 !!


점점 사이트가 완성 되간다.

이제 이 기능들을 토대로 레시피만 완성 하면 끝난다


아마 5월 초까지 완성하지 않을까 싶다.


파이팅 


https://github.com/MoonSeokHyun

반응형
반응형

이전에는 내가 만든 사이트에서 회원관리를 만드는걸 리뷰해보았다.

이번에 2번쨰 시간이다.

핀란드에서 부활절 휴일이 끼니.. 개발을 놓게 되었다. 

반성하며 시작합니다.


우선 게시글 수와 댓글수를 불러오려면

서브쿼리를 사용하여 불러온다 코드는 다음과 같다. 

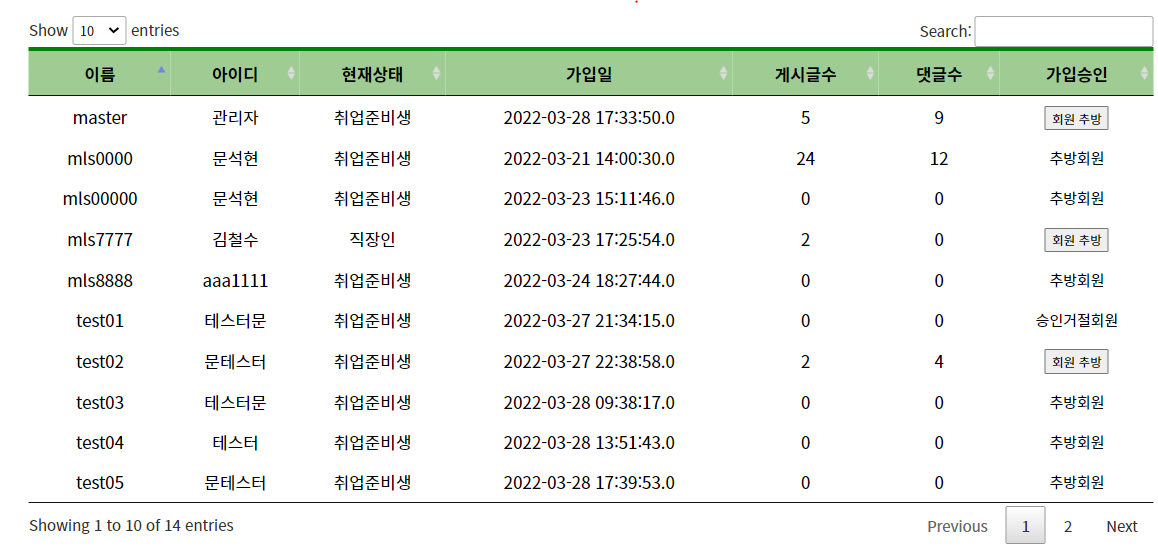
   <select id="adminUserList2"
      resultMap="UserInfo">
   select u.*,
    (select count(*) from job_board where board_writer = u.user_id) as board_cnt,
    (select count(*) from job_comment where com_writer = u.user_id) as comment_cnt
    
   from user_info u
   order by u.user_no desc

   </select>

유저의 모든것을 조회하면서 

게시물수와 댓글 갯수를  as __cnt 라는것으로

끌고 온다.


이렇게 끌고오면 게시글과 댓글수가 끌고와지는데


꼭 VO에 추가해주어야한다. 

그래야 자료를 활용할 수있다. 


public class UserVO {

	private int userNo;
	private String userId;
	private String userName;
	private String userPw;
	private String userPh;
	private int userAdr1;
	private String userAdr2;
	private String userAdr3;
	private String userAdr4;
	private int userStatus;
	private String userEmail;
	private String userCompany;
	private int adminType;
	private int userPass;
	private Timestamp userDate;
	private int boardCnt;
	private int commentCnt;


private int boardCnt;
private int commentCnt;

을 추가해 주었다. 


이렇게 완성되었으면 이제 게시글 수를 눌렀을때 


해당 아이디가 쓴 게시물을 쫙 보여주면 된다. 


그럼 뷰로 가보자 


    <!-- 게시글 모달로 가져오기-->
    <div class="modal_list">
      <div class="modal_boradlist">
        <div class="reply_listWrap">

          <div class="modal_wrap">
            <h3 id="ListName"></h3>
            <p class="modallist">작성한 게시글 수 : 총 01개</p>
            <table class="admin_boardM_wrap" id="comment-admin">
              <thead class="admin_boardMList">
                <th class="admin_boardM_title">글 번호</th>
                <th class="admin_boardM_title">글 제목</th>
                <th class="admin_boardM_title boardleng">작성일</th>
                <th class="admin_boardM_title">조회수</th>
                <th class="admin_boardM_title">좋아요</th>
              </thead>
              </tbody>
              <tbody id="getBoardList">
				<!-- 게시글이 들어갈 공간 -->
              </tbody>
            </table>

이렇게 클릭하면 모달이 뜨게 작성했다. 

이것도 데이터 테이블을 사용하여 

페이징 등을 진행 하였다.


이제 js를 보자


let str = '';
      // 모달 스크립트 
      $(function () {
    	  $("#user-admin").DataTable();
        // 게시판 모달
        $('.modal_boardList_admin').click(function () {
        	var board_id = $(this).data("userId");
        	console.log(board_id);

        	getList(true, board_id);
          $('.modal_list').fadeIn(500);
        }); // open modal end
        
        function getList(reset, board_id) {
        	
        	if(reset) {
        		str = '';
        	}
        	
        	$.ajax({
        		type : 'post',
        		url : '<c:url value ="/admin/getUserBoardList"/>',
                data : {
                	board_writer : board_id,
                	},
        		dataType : "json",
        		success : function(data) {
					for(var i = 1 in data){
						console.log(data[i].board_title);
						str += "<tr class='admin_boardM_content'>"
						str += "<td class='admin_boardM_nm'><a href='#'>"+data[i].board_no+"</a></td>"
						str += "<td class='admin_boardM_nm'><a href='#'>"+data[i].board_title+"</a></td>"
						str += "<td class='admin_boardM_nm'><a href='#'>"+timeStamp(data[i].board_regdate)+"</a></td>"
						str += "<td class='admin_boardM_nm'>"+data[i].board_hit+"</td>"
						str += "<td class='admin_boardM_nm'>"+data[i].board_like+"</td>"
						str += "</tr>"
					}
					$('#ListName').html(board_id + '님의 작성 게시물')
					$('#getBoardList').html(str); 
					$("#comment-admin").DataTable();
				},error : function(status, error) {
					console.log('에러발생!!');
					console.log(status, error);
				}

	          });//ajax 종료
		}


우선 json으로 던질 아이디 값을 가져오기 위해


 <td class="admin_board_content_nm"><a href="#" class="modal_boardList_admin" data-user-id ="${vo.userId}">${vo.boardCnt}</a></td>

var board_id = $(this).data("userId");로 아이디 값을 가져 온다. 


가져 온뒤 본격적으로 ajax를 작성한다.

<select id="getUserBoardList" resultType="com.community.shy.board.command.BoardVO">
         select * from job_board where board_writer = #{board_writer}
      </select>


해당 쿼리문을 보자 


json으로 해당 아이디를 컨트롤러로 전하고 

모든 해당 게시물을 조회하면 된다. 


url에 있는 getUserBoardList로 가보자 


컨트롤러 

	@ResponseBody
	@PostMapping("/getUserBoardList")
	public List<BoardVO> getUserBoardList(String board_writer) {
		System.out.println("open! user boardList ajax!");
		System.out.println("조회할 회원 아이디 : " + board_writer);
		List<BoardVO> list = service.getUserBoardList(board_writer);
		
		return list;
	}


어드민 컨트롤러는 일반 컨트롤러로 해서 rest다입인 responsebody를 붙혀준다. 


그냥 조회만 할껀데 왜 포스트를 썻지.. 

다음에 하면 아마 get으로 할꺼같다. 


그럼 이제 컨트롤러 -> 서비스 -> 매퍼 -> 컨트롤러 -> 뷰 순으로 돌아가서 

해당 아이디의 모든 데이터를 받아볼수 있을것이다. 


요론식으로 


그다음 뷰에서 json으로 받았으면 

화면에 뿌려주게 반복문을로 받아준다. 


str 이라는 빈 변수를 선언하여 

모달에 들어갈 내용들을 적어준다.

그러면 리스트에 담긴 수를 다 쏟아 낼 것이다. 


댓글도 똑같기 때문에 별 다르게 할 건 없을거같다.


다음에는 회원관리에 대해서 말해보려고 한다.


이제 그만쉬고 ㅋㅋ 다시 빡코딩 하자 

5월 15일 전까지 만들고 있는 사이트 다완성하자


파이팅 ㅋㅋ 


https://github.com/MoonSeokHyun

반응형
반응형

몇일전 A존인 파실라에 다녀왔다.

꼭 파실라역은 우리 한국사람들에게 익숙한

용산 기차역과 비슷하게 생겼다. 


내가 전해 듣기로는 파실라에 한국인들도 많이 산다고했다.

그래서 그런가? 한두명 본거같다 한국사람


그래도 열심히 걸어보자

 부활절 휴일이라 그런가 아무곳도 열지 않았다.

평소에 자주가던 중고가게도 가보려고했느데 ㅠㅠ 

어쩔수 없다..


날씨는 4월의 하늘처럼 좋짐나 어딘가.. 다크한 분위기의 파실라였다.


신도시와 구도심이 여러가지 복합적으로 이어져있어 

인상 깊었다., 


오피스 타워 들이 많아서 그런가 나중에 직장인들도 많이 보일거같다. 


몰도 있고 

이날따라 날씨가 바람이 많이 불어 ㅠㅠ 좀 힘들었다. 


요즘 핀란드 신축주택? 은 이런식으로 짖는거같다. 

오렌지 색에 여러가지 테라스가 인상적이다. 


무슨 공장같은데 꼭 해리포터에 나오는 건물 같이 생겼다. 

놀이공원인데 아직 열지 않았다.

나중에 5월에 열면 한번 가봐야겠다.


생각보다 재미있는 것들이 많아보인다. 

에스토니아 마트에서 맛있다고 해서 산 빵인데

건포도에 살짝 꾸덕한 치즈에 그냥 빵이다.

그냥 .. 크림빵 같은 느낌

맛있엇다. 


그리고 피자로 마무리~ 맥주한잔까지 

완벽한 하루였다.


아참 피자에 감자칩 이렇게 올려먹으면 매우 맛있다 ㅋㅋ 

반응형
반응형

진짜 한 3일 삽질 했엇던 

CK에디터 이미지 업로드 방금 성공해서 


드디어 포스팅을한다. 

방법은 스프링레거시 프로젝트 내에서 폴더를 생성하여 그것을 저장하여 url화 하여 json으로 ck에디터로 뿌려주면 된다. 


그럼 이제 방법을 살펴보자 .


https://ckeditor.com/ckeditor-4/?ppc_keyword=ckeditor4&gclid=CjwKCAjw6dmSBhBkEiwA_W-EoEfmmdMseX5ETbtapK8JIJnxKQiqjfQKMXiY_8d_9S3464Sc5qG_mhoCQ1oQAvD_BwE 


CKEditor 4 | Visual Text Editor for HTML

Fully Customizable WYSIWYG HTML Editor with the biggest number of Rich Text features. Enterprise-grade with 70 languages and the approval of millions.

ckeditor.com


우선 위에 보이는 곳으로 가서 ck에디터를 다운받자 

다운 받은 후에 프로젝트 webapp > resources폴더에다 붙혀 넣기 해주자 


대략 이런 형태가 될 것이다. 


그 후에 view로 가서 적용시킬 jsp페이지로 가준다. 


<resources mapping="/ckeditor/**" location="/resources/ckeditor/" />

그전에 servlet-context에서 경로좀 매핑해주자 그래야 편하다. 


그다음 


<script type="text/javascript" src="../resources/ckeditor/ckeditor.js"></script>


          <div class="mb-3" style="width: 50%; margin: 0 auto;">
            <label for="exampleFormControlTextarea1" class="form-label">News Content</label>
            <textarea class="form-control " name="freeboard_content" id="ckeditor" rows="6"></textarea>
          </div>

	 CKEDITOR.replace( 'ckeditor', {//해당 이름으로 된 textarea에 에디터를 적용
         width:'100%',
         height:'400px',
         filebrowserUploadUrl:  "fileupload.do"
     });

위처럼 헤드사이에 스크립트 코드를 넣어주고 


텍스트에어리어에 id값을 ckeditor로 해준다. (아이디 값은 딱히 상관 없다.)

그 다음 하단 부분 스크립트 태그 사이에 


ckeditor로 넣어준다. 


그리고 filebrowserUploadUrl:  "fileupload.do" 

요 코드는 컨트롤러랑 연결해 줄 코드 이다. 


<c:url/> 을 쓰던 컨트롤러랑 연결만 되면 된다. 


그러면 위와 같이 ckeditor가 연결 되었을 것이다.


그럼 이제 ck에디터 사용은 끝이고 

컨트롤러를 보자 !


그전에 추가해주어야할 api가 있다. 


		    <dependency>
		        <groupId>org.apache.commons</groupId>
		        <artifactId>commons-lang3</artifactId>
		        <version>3.4</version>
		    </dependency>
            
        <dependency>
		    <groupId>commons-fileupload</groupId>
		    <artifactId>commons-fileupload</artifactId>
		    <version>1.3.3</version>
		</dependency>
        
        		<dependency>
		    <groupId>com.google.code.gson</groupId>
		    <artifactId>gson</artifactId>
		    <version>2.8.5</version>
		</dependency>

이 세가지 정도면 될거같다. 


gson은 말 그대로 구글에서 만든 json을 쉽게 쓸수 있도록 만든 api이다. 

commons-fileupload 파일 업로드 api

commons-lang3 아파치에서 만든 스트링 비교를 쉽게 해줄수 있는 api 이다. 


그다음 파일 빈등록을 해주자.


파일업로드만 해주면 될거같다. 

	<beans:bean id="multipartResolver" class="org.springframework.web.multipart.commons.CommonsMultipartResolver">
		
		<!-- 최대 업로드 가능한 바이트 크기(바이트 단위), -1은 제한이 없음을 의미 -->
		<beans:property name="maxUploadSize" value="10485760" />
		
		<!-- 업로드 요청을 변환할 때 사용할 문자 인코딩 방식 -->
		<beans:property name="defaultEncoding" value="utf-8" />
	
	</beans:bean>

servlet-context에 위와 같이 붙혀 넣어주자 빈등록을 하였으면 

이제 컨트롤러로 가보자 


컨트롤러를 따로 분리해도 되지만 나는 그냥 기존 컨트롤러에 이어서 작성하였다. 


CK에디터 4.8.0부터 파일 전달 방식이 json으로 바뀌었다. 

그래서 바뀐 최신 버전으로 사용했다. 


	@ResponseBody
	@RequestMapping(value = "fileupload.do")
    public void communityImageUpload(HttpServletRequest req, HttpServletResponse resp, MultipartHttpServletRequest multiFile) throws Exception{
		JsonObject jsonObject = new JsonObject();
		PrintWriter printWriter = null;
		OutputStream out = null;
		MultipartFile file = multiFile.getFile("upload");
		
		if(file != null) {
			if(file.getSize() >0 && StringUtils.isNotBlank(file.getName())) {
				if(file.getContentType().toLowerCase().startsWith("image/")) {
				    try{
				    	 
			            String fileName = file.getOriginalFilename();
			            byte[] bytes = file.getBytes();
			           
			            String uploadPath = req.getSession().getServletContext().getRealPath("/resources/images/noticeimg"); //저장경로
			            System.out.println("uploadPath:"+uploadPath);

			            File uploadFile = new File(uploadPath);
			            if(!uploadFile.exists()) {
			            	uploadFile.mkdir();
			            }
			            String fileName2 = UUID.randomUUID().toString();
			            uploadPath = uploadPath + "/" + fileName2 +fileName;
			            
			            out = new FileOutputStream(new File(uploadPath));
			            out.write(bytes);
			            
			            printWriter = resp.getWriter();
			            String fileUrl = req.getContextPath() + "/resources/images/noticeimg/" +fileName2 +fileName; //url경로
			            System.out.println("fileUrl :" + fileUrl);
			            JsonObject json = new JsonObject();
			            json.addProperty("uploaded", 1);
			            json.addProperty("fileName", fileName);
			            json.addProperty("url", fileUrl);
			            printWriter.print(json);
			            System.out.println(json);
			 
			        }catch(IOException e){
			            e.printStackTrace();
			        } finally {
			            if (out != null) {
		                    out.close();
		                }
		                if (printWriter != null) {
		                    printWriter.close();
		                }
			        }
				}

			
		}
		
	}
	}

우선 json을 사용하기 위해 생성자를 이용해 성성해준다. 


그 후 파일사이즈가 0일 떄 비교 식을 작성해주고 

그안에 또 if문으로 startsWith가 image인 것만 등록 되게 해주었다. 


fileName으로 파일명을 넣어주고 

byte[] bytes = file.getBytes(); 로 파일 크기 도 가져온다. 


String uploadPath = req.getSession().getServletContext().getRealPath("/resources/images/noticeimg");


저장 경로는 서버내 resoureces 내에 images / noticeing로 생성해 주었다. 


이제 파일 전송을 클릭하면 여기에 저장될 것이다. 


그리고 


 File uploadFile = new File(uploadPath);
            if(!uploadFile.exists()) {
             uploadFile.mkdir();
            }

파일 객체를 생성해주고 

폴더가 없다면 생성해준다. 

나중에 심플데이트포멧으로 파일명을 변경 해주어도 될거같다. 


    String fileName2 = UUID.randomUUID().toString();
            uploadPath = uploadPath + "/" + fileName2 +fileName;


그리고 filename2를 생성하여 uuid로 랜덤값을 생성해준다. 


그 후 uploadPath에 붙혀넣어 준다. 


그럼 resources/images/noticeimg/uuid랜덤값+파일명

으로 저장될 것이다. 


 printWriter = resp.getWriter();

request 객체를 보낸 곳으로 데이터를 전달.

오류 없이 실핼될 경우 success : function()의 매개변수로 들어간다.


이제 fileUrl을 만들어보자.


String fileUrl = req.getContextPath() + "/resources/images/noticeimg/" +fileName2 +fileName;


상대경로로 만들어 준다. 


/서버명 혹은 localhost//resources/images/noticeimg/" +fileName2 +fileName;


이런식으로 만들어 질 것이다. 


그리고 이제 json으로 뿌려주자.


         System.out.println("fileUrl :" + fileUrl);
            JsonObject json = new JsonObject();
            json.addProperty("uploaded", 1);
            json.addProperty("fileName", fileName);
            json.addProperty("url", fileUrl);
            printWriter.print(json);


그리고 메모리 자원관리를 위해

다쓴 메소드는 close로 닫아준다.


그럼 정말 끝!


정말 애먹었던 부분이 위 경로 때문에 

자꾸 엑박이 뜬다면 경로를 점검 해보자 :) 


작동 과정 


파일 선택 을 클릭하여 파일을 선택해준다. 


선택 후 서버로 전송을 눌러주면


이렇게 성공한다. 


이렇게 에디터에 잘 들어간다.


그리고 이거 그대로 파라미터로 태워서 인서트를 시켜주면 된다. 


이렇게 아주 잘 뜨는게 볼 수 있을 거다.


이거 한다고 거의 2틀을 고생했던거 같다. 


페이징부터 참 해보고싶은건 많이만 

자바 기초를 정말 틈틈히 다시 공부해야겠다. 


정말 너무 해깔린다. 


파이팅 하자 ! 

https://github.com/MoonSeokHyun

반응형
반응형

저번에 포스팅했던 페이징이 1개씩만 올라가서 ..

뭐지 하다가 

방법을 찾았다! 


pagevo에 private int pagecnt;를 추가하자


	//사용자가 선택한 페이지 정보를 담을 변수.
	private int pageNum;
	private int countPerPage;
	private int pagecnt;
    public int getPageStart() {
	        return (pageNum-1)*countPerPage;
	    }

	//검색에 필요한 데이터를 변수로 선언.
	private String keyword;
	private String condition;
	
	public PageVO() {
		this.pageNum = 1;
		this.countPerPage = 10;
	}

이제 위에 것으로 매퍼를 바꿔줄 것이다.


     <select id="getFreeBoard" resultType="com.vegan.recipe.freeBoard.freeboardVO">

     	select * from Vegan_freeBoard 
     	<include refid="search" />
     	order by freeboard_no desc
     	limit #{pagecnt} ,  #{countPerPage}

기존 pageNum에서 pagecnt로 바꿧다.


그후 jsp에서


          <input type="hidden" name="pageNum" value="${pc.paging.pageNum}">
	                            <input type="hidden" name="countPerPage" value="${pc.paging.countPerPage}">
	                            <input type="hidden" name="keyword" value="${pc.paging.keyword}">
	                            <input type="hidden" name="condition" value="${pc.paging.condition}">
	                            <input type="hidden" name="pagecnt" value="10">

히든 값으로 pagecnt를 추가해 주었다. 


그후 컨트롤러에서 


	@GetMapping("/freeList")
	public String getFree(Model model, PageVO vo) {
		System.out.println("자유 게시판으로 이동");
		System.out.println("검색어" + vo.getKeyword());
		System.out.println("검색조건" + vo.getCondition());
		
		PageCreate pc = new PageCreate();
		pc.setPaging(vo);
		pc.setArticleTotalCount(service.getTotal(vo));
		
		System.out.println(pc);
		vo.setPagecnt((vo.getPageNum()-1) * vo.getCountPerPage());
		model.addAttribute("freeList", service.getFreeBoard(vo));
		model.addAttribute("pc", pc);
		
		return "FreeBoard/freeList";
	}

vo.setPagecnt((vo.getPageNum()-1) * vo.getCountPerPage());

를 추가 해준다. 


생각해보면 당연한거였다. 

pagenu,m은 1씩을라가는데 1씩 올리니 페이지가 이동해도 1밖에 올라가지 않았다. 

이렇게 하면 10씩 쫙쫙올라간다.


ㅎ ㅏ

페이징만 4시간 넘게 한거같다. 진빠져..


근데 진짜 페이징은 제대로 익힌듯 하다..


씻고 자자 11시에 까먹을까봐 포스팅을 하는나 멋져

반응형
반응형

항상 오라클만 썻던 나에게는 

오라클 처럼 rownum으로 하면 되겠지?? 

라고 생각하던 차에 새로 만들고 있는 웹사이트에서 행복 회로를 돌리며 

매퍼작성을 끝냇는데

응 ?? badsql?? 읭 왜?? 

나의 착오 였다.


그렇다 

MYSQL에서는 ROWNUM을 지원하지 않아 

다른 문법으로 해야한다. 


그래서 폭풍 검색끝에 limit이라는 걸 찾아 냈다.

오히려 오라클보다 너무 쉬워 까먹기전에 포스팅을 해야겠다고 생각했다. 


우선 구현한 페이지를 보자 


우선 페이지삼아 더미데이터를 약 2만 7천개 정도 넣었다 .

10만개가 안되면 데이터테이블쓰는게 이롭지만.. 


각설 하고 기존 오라클 페이징 에서 크게 벗어나지는 않는다. 


우선 모델 객체부터 살펴보자 .


PageVO 객체

@Getter
@Setter
@ToString
public class PageVO {

	//사용자가 선택한 페이지 정보를 담을 변수.
	private int pageNum;
	private int countPerPage;
	
	//검색에 필요한 데이터를 변수로 선언.
	private String keyword;
	private String condition;
	
	public PageVO() {
		this.pageNum = 1;
		this.countPerPage = 10;
	}
}

앞서 설명한거와 같이 사용자가 선택한 페이지 정보를 담고 

검색은 키워드와 컨디션으로 통일한다. 

그리고 생성자를 하나 꺼내 맨 처음 페이지 1과 페이지에 보여줄 게시글 수 10개를 선택해준다. 


PageCreate 객체

@Getter
@Setter
@ToString
public class PageCreate {

	private PageVO paging;
	private int articleTotalCount;
	private int endPage;
	private int beginPage;
	private boolean prev;
	private boolean next;
	
	private final int buttonNum = 5;
	
	
	private void calcDataOfPage() {
		
		endPage = (int) (Math.ceil(paging.getPageNum() / (double) buttonNum) * buttonNum);
		
		beginPage = (endPage - buttonNum) + 1;
		
		prev = (beginPage == 1) ? false : true;
		
		next = articleTotalCount <= (endPage * paging.getCountPerPage()) ? false : true;
		
		if(!next) {
			endPage = (int) Math.ceil(articleTotalCount / (double) paging.getCountPerPage()); 
		}
		
	}
	
	public void setArticleTotalCount(int articleTotalCount) {
		this.articleTotalCount = articleTotalCount;
		calcDataOfPage();
	}

그 후 endpage next 등 페이지를 설정 해준다. 

여기서 setArticleTotalCount는

컨트롤러에서 총 게시물의 개수를 PageCreate에게 전달한 직후에

바로 페이징 버튼 알고리즘이 들어수 있도록 setter를 약간의 커스텀을 해줆.


그 후  검색을 할수 있게 아래와 같이 sql문을 매퍼에 작성해준다. 


1. 특정 문자로 시작하는 데이터 검색

SELECT [필드명] FROM [테이블명] WHERE [필드명] LIKE '특정 문자열%';


2. 특정 문자로 끝나는 데이터 검색

SELECT [필드명] FROM [테이블명] WHERE [필드명] LIKE '%특정 문자열';


3. 특정 문자를 포함하는  데이터  검색

SELECT [필드명] FROM [테이블명] WHERE [필드명] LIKE '%특정 문자열%';


[MySQL]
title like CONCAT('%',#{keyword},'%')


[Oracle]
title like '%' ||  #{keyword} || '%'


[MSSQL]
title like '%' + #{keyword} + '%'

로 지정해주면 된다.

	<sql id="search">
		<if test="condition == 'freeboard_title'">
			WHERE freeboard_title LIKE CONCAT('%',#{keyword},'%')
		</if>
		<if test="condition == 'freeboard_content'">
			WHERE freeboard_content LIKE CONCAT('%',#{keyword},'%')
		</if>
		<if test="condition == 'freeboard_writer'">
			WHERE freeboard_writer LIKE CONCAT('%',#{keyword},'%')
		</if>
	</sql>
     <!-- 토탈 -->
     	<select id="getTotal" resultType="int">
		SELECT COUNT(*)
		FROM Vegan_freeBoard
		<include refid="search" />
	</select>
    
      <select id="getFreeBoard" resultType="com.vegan.recipe.freeBoard.freeboardVO">
     	select * from Vegan_freeBoard 
     	<include refid="search" />
     	order by freeboard_no desc
     	limit #{pageNum} ,  #{countPerPage}
     </select>


토탈을 구해주고 리밋으로 페이지넘과 페이지 수를 전달해준다. 


컨트롤러 부분


	@GetMapping("/freeList")
	public String getFree(Model model, PageVO vo) {
		PageCreate pc = new PageCreate();
		pc.setPaging(vo);
		pc.setArticleTotalCount(service.getTotal(vo));
		
		System.out.println(pc);
		
		model.addAttribute("freeList", service.getFreeBoard(vo));
		model.addAttribute("pc", pc);
		
		return "FreeBoard/freeList";
	}


페이지 크리에이트 와 pagevo 객체를 변수 로 선택해주고 모델로 뷰로 날려준다.


    </div>
	
                 <form action="<c:url value='/FreeBoard/freeList'/>">
                        <div class="search-wrap clearfix">
                            <button type="submit" class="btn btn-primary search-btn" style="margin-right: 24%;">검색</button>
                            <input type="text" name="keyword" class="form-control search-input" value="${pc.paging.keyword}"
                            style="width: 200px; ">
                            <select class="form-control" id="search-select" name="condition" style="width: 80px; margin-left: 54%">
                                <option value="freeboard_title" ${pc.paging.condition == 'freeboard_title' ? 'selected' : ''}>제목</option>
                                <option value="freeboard_content" ${pc.paging.condition == 'freeboard_content' ? 'selected' : ''}>내용</option>
                                <option value="freeboard_writer" ${pc.paging.condition == 'freeboard_writer' ? 'selected' : ''}>작성자</option>
                            </select>
                        </div>
                    </form> 
	
    <!-- 비건 뉴스 상세보기 -->
    <table class="table" style="width: 70%; margin: 0 auto;">
        <thead>
          <tr>
            <th scope="col">#</th>
            <th scope="col">제목</th>
            <th scope="col">작성자</th>
            <th scope="col">작성 시간</th>
            <th scope="col">조회수</th>
            <th scope="col">좋아요</th>
          </tr>
        </thead>
        <tbody>
        <c:forEach var="vo" items="${freeList}">
          <tr>
          	<th scope="row">${vo.freeboard_no}</th>
            <td><a href="<c:url value='/FreeBoard/freeDetail?freeboard_no=${vo.freeboard_no}'/>">${vo.freeboard_title}</a></td>
            <td>${vo.freeboard_writer}</td>
            <td>${vo.freeboard_regDate}</td>
            <td>${vo.freeboard_hit}</td>
            <td>${vo.freeboard_like}</td>
          </tr>
         </c:forEach>
        </tbody>
      </table>

            <!-- 글작성 -->

            <div class="newsWrite">
                <button type="button" class="btn btn-primary whyBtn">글작성</button>
              </div>
        
              <!-- 페이징 -->
        
			<div class="paging">
					<form action="<c:url value='/FreeBoard/freeList' />" name="pageForm">
	                        <div class="text-center clearfix">
	                            <ul class="pagination" id="pagination">
	                            	<c:if test="${pc.prev}">
	                                	<li class="page-item "><a  class="page-link" href="#" data-pageNum="${pc.beginPage-1}">Prev</a></li>
	                                </c:if>
	                                
	                                <c:forEach var="num" begin="${pc.beginPage}" end="${pc.endPage}">
	                                	<li class="${pc.paging.pageNum == num ? 'age-item active' : ''}" page-item><a class="page-link" href="#" data-pageNum="${num}">${num}</a></li>
	                                </c:forEach>
	                                
	                                <c:if test="${pc.next}">
	                               		<li class="page-item"><a class="page-link" href="#" data-pageNum="${pc.endPage+1}">Next</a></li>
	                                </c:if>
	                            </ul>
	                            
	                            <!-- 페이지 관련 버튼을 클릭 시 같이 숨겨서 보낼 값 -->
	                            <input type="hidden" name="pageNum" value="${pc.paging.pageNum}">
	                            <input type="hidden" name="countPerPage" value="${pc.paging.countPerPage}">
	                            <input type="hidden" name="keyword" value="${pc.paging.keyword}">
	                            <input type="hidden" name="condition" value="${pc.paging.condition}">
	                            
	                        </div>
                        </form>
			</div>
                        
<%@include file="../include/footer.jsp"%>
</body>

<script>
	$(function() {
		$('.whyBtn').click(function() {
			location.href = '<c:url value="/FreeBoard/freeWrite"/>';
		})
		$('#pagination').on('click', 'a', function(e) {
			e.preventDefault();
			console.log($(this));
			const value = $(this).data('pagenum');
			console.log(value);
			document.pageForm.pageNum.value = value;
			document.pageForm.submit();
		});
		
	})
</script>
</html>

그 후 검색으로 올 수 있도록 select로 option값을 준다. 그 뒤 컨트롤러로 보내 sql문을 타게해 조회된 결과를 보여주면 된다. 


페이징 같은 경우는 hidden으로 값을 숨겨 보낸뒤 자바스크립트로 마무리를 해주었다. 


작동이 아주 잘된다. 


https://github.com/MoonSeokHyun

반응형

+ Recent posts