반응형

저번에는 홍길동이라는 이름으로 글쓴이로 작성되었다.

이제는 user와 board를 

일대 다로 하여 글을 쓰면 글쓴이로 등록되게 해보자 


우선 user_id를 조인한다고 생각하자 


그 후 모델 객체에 어노테이션을 추가하자 


import lombok.Data;

import javax.persistence.*;
import javax.validation.constraints.NotNull;
import javax.validation.constraints.Size;

@Entity
@Data
public class Board {

    @Id
    @GeneratedValue(strategy = GenerationType.IDENTITY)
    private long id;
    @NotNull
    @Size(min = 2,max = 30 , message = "제목은 2자이상 30자 이하 입니다.")
    private String title;
    @NotNull
    @Size(min = 1, message = "내용을 입력해주세요.")
    private String content;

    @ManyToOne
    @JoinColumn(name = "user_id")
    private  User user;
}

그 후 글을 쓰려면 

인증정보를 가져와야한다. 


    @PostMapping("/form")
    public String postForm(@Valid Board board, BindingResult bindingResult , Authentication authentication){
//        vaildator.validate(board,bindingResult);
        if(bindingResult.hasErrors()){
            return "board/form";
        }
        String username = authentication.getName();
        boardService.save(username,board);
//        boardRepository.save(board);
        return "redirect:/board/list";
    }
}
String username = authentication.getName();

로 인증정보를 가져올 수있다. 


@Autowired
private BoardRepository boardRepository;

@Autowired
private UserRepository userRepository;
public Board save(String username , Board board){
 User user =  userRepository.findByUsername(username);
 board.setUser(user);

 return boardRepository.save(board);

}

그 후 서비스로 넘어와 save() 메소드를 작성 해준다. 

유저 레포지토리에서 유저를 먼저 찾아 board.setUser에 담아준다. 

그 후 save(board)를 해주면 된다. 


홍길동에서 변경된걸 볼 수 있다.

반응형
반응형

저번에는 회원가입 처리를 해보았다.

이제는 로그인 처리를 해보자 


로그인을 위해 

 타임리프 엑스트라스 스프링5 디펜던시 추가를 해준다.


<dependency>
   <groupId>org.thymeleaf.extras</groupId>
   <artifactId>thymeleaf-extras-springsecurity5</artifactId>
   <version>3.0.4.RELEASE</version>
</dependency>


를 추가 해준다.


그 후 https://www.thymeleaf.org/doc/articles/springsecurity.html 


Thymeleaf + Spring Security integration basics - Thymeleaf

Have you switched to Thymeleaf but your login and error pages are still using JSP? In this article we will see how to configure your Spring application to use Thymeleaf for login and error pages. All the code seen here comes from a working application. You

www.thymeleaf.org

를 참고 하여 


<div sec:authorize="isAuthenticated()">
  This content is only shown to authenticated users.
</div>
<div sec:authorize="hasRole('ROLE_ADMIN')">
  This content is only shown to administrators.
</div>
<div sec:authorize="hasRole('ROLE_USER')">
  This content is only shown to users.
</div>

를 이용하여 로그인 처리 및 로그아웃 처리를 해준다 !


<!DOCTYPE>

<html xmlns="http://www.w3.org/1999/xhtml"
      xmlns:th="http://www.thymeleaf.org" xmlns:sec="http://www.thymeleaf.org/extras/spring-security"
>
<head th:fragment="head(title)">
    <meta charset="utf-8">
    <meta name="viewport" content="width=device-width, initial-scale=1, shrink-to-fit=no">

    <!-- Bootstrap CSS -->
    <link rel="stylesheet" href="https://cdn.jsdelivr.net/npm/bootstrap@4.6.1/dist/css/bootstrap.min.css" integrity="sha384-zCbKRCUGaJDkqS1kPbPd7TveP5iyJE0EjAuZQTgFLD2ylzuqKfdKlfG/eSrtxUkn" crossorigin="anonymous">
    <link href="starter-template.css" th:href="@{/css/starter-template.css}" rel="stylesheet">

    <title th:text="${title}"></title>
</head>
<body>

<nav class="navbar navbar-expand-md navbar-dark bg-dark fixed-top" th:fragment="menu(menu)">
    <a class="navbar-brand" href="#">Spring Boot</a>
    <button class="navbar-toggler" type="button" data-toggle="collapse" data-target="#navbarsExampleDefault" aria-controls="navbarsExampleDefault" aria-expanded="false" aria-label="Toggle navigation">
        <span class="navbar-toggler-icon"></span>
    </button>

    <div class="collapse navbar-collapse" id="navbarsExampleDefault">
        <ul class="navbar-nav mr-auto">
            <li class="nav-item " th:classappend="${menu} == 'home' ? 'active'">
                <a class="nav-link" href="#"  th:href="@{/}">홈 <span class="sr-only" th:if="${menu} == 'home'">(current)</span></a>
            </li>
            <li class="nav-item" th:classappend="${menu} == 'board' ? 'active'">
                <a class="nav-link" href="#" th:href="@{/board/list}">게 시 판 <span class="sr-only" th:if="${menu} == 'board'">(current)</span> </a>
            </li>
        </ul>
            <a class="btn btn-secondary my-2 my-sm-0"  sec:authorize="!isAuthenticated()"th:href="@{/account/login}">Login</a>
             <a class="btn btn-secondary my-2  mx-2 my-sm-0"  sec:authorize="!isAuthenticated()"th:href="@{/account/register}">Sign Up</a>
        <form class="form-inline my-2 my-lg-0" sec:authorize="isAuthenticated()" th:action="@{/logout}" method="post">
            <span class="text-white" sec:authentication="name" >사용자</span>
            <span class="text-white mx-2" sec:authentication="principal.authorities" >권한</span>
            <button class="btn btn-secondary my-2 my-sm-0" type="submit">Logout</button>
        </form>
    </div>
</nav>


반응형
반응형

우선 스프링 시큐리티를 사용하기 위해 


<dependency>
  <groupId>org.springframework.boot</groupId>
  <artifactId>spring-boot-starter-security</artifactId>
</dependency>
<dependency>
  <groupId>org.springframework.security</groupId>
  <artifactId>spring-security-test</artifactId>
  <scope>test</scope>
</dependency>


디펜던시를 추가해 주자 

이렇게 하면 스프링 시큐리티를 쓸 준비는 끝난다 

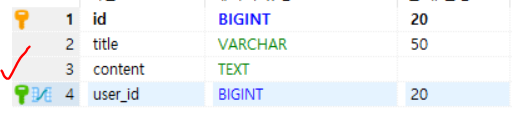
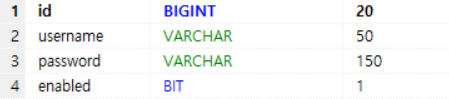
이제 회원가입을 위해 User Table과 User Model 을 생성해보자


이런식으로 추가 해줬다.

그후 


package com.seogi.myhome.model;

import lombok.Data;

import javax.persistence.*;
import java.util.ArrayList;
import java.util.List;

@Entity
@Data
public class User {
    @Id
    @GeneratedValue(strategy = GenerationType.IDENTITY)
    private long id;

    private String username;
    private String password;
    private boolean enabled;

이렇게 모델 객체를 생성해준다. 


그 후 config 패키지를 생성을 해주고 

WebSecurityConfig를 만들어준다. 

https://www.baeldung.com/spring-security-jdbc-authentication


Spring Security: Exploring JDBC Authentication | Baeldung

Explore the capabilities offered by Spring to perform JDBC Authentication using an existing DataSource configuration.

www.baeldung.com

사이트는 이곳을 참고 하였다. 


package com.seogi.myhome.config;

import org.springframework.beans.factory.annotation.Autowired;
import org.springframework.context.annotation.Bean;
import org.springframework.context.annotation.Configuration;
import org.springframework.security.config.annotation.authentication.builders.AuthenticationManagerBuilder;
import org.springframework.security.config.annotation.web.builders.HttpSecurity;
import org.springframework.security.config.annotation.web.configuration.EnableWebSecurity;
import org.springframework.security.config.annotation.web.configuration.WebSecurityConfigurerAdapter;
import org.springframework.security.core.userdetails.User;
import org.springframework.security.core.userdetails.UserDetails;
import org.springframework.security.core.userdetails.UserDetailsService;
import org.springframework.security.crypto.bcrypt.BCryptPasswordEncoder;
import org.springframework.security.crypto.password.PasswordEncoder;
import org.springframework.security.provisioning.InMemoryUserDetailsManager;

import javax.sql.DataSource;

@Configuration
@EnableWebSecurity
public class WebSecurityConfig extends WebSecurityConfigurerAdapter {
    @Autowired
    private DataSource dataSource;

    @Override
    protected void configure(HttpSecurity http) throws Exception {
        http
                .authorizeRequests()
                .antMatchers("/" , "/account/register","/css/**" ).permitAll()
                .anyRequest().authenticated()
                .and()
                .formLogin()
                .loginPage("/account/login")
                .permitAll()
                .and()
                .logout()
                .permitAll();
    }
    @Autowired
    public void configureGlobal(AuthenticationManagerBuilder auth)
            throws Exception {
        auth.jdbcAuthentication()
                .dataSource(dataSource)
                .passwordEncoder(passwordEncoder()) // 비밀번호를 암호화 하는 작업
                // 인증처리
                .usersByUsernameQuery("select username,password,enabled "
                        + "from user "
                        + "where username = ?")
                // 권한처리
                .authoritiesByUsernameQuery("select u.username,r.name "
                        + "from user_role ur inner join user u on  ur.user_id = u.id "
                        + "inner join role r on ur.role_id = r.id "
                        + "where u.username = ?");
    }
    @Bean
    public PasswordEncoder passwordEncoder() {
        return new BCryptPasswordEncoder();
    }
}

이렇게 추가해준다. 

이렇게 할 경우에 antMatchers 에 인증처리가 없어도 접속할 수있는

페이지를 설정해주고 

loginPage는 login api를 설정해준다.ㅣ 


그후 PasswordEndcoder를 설정하여 회원가입을 할때 

비밀번호를 단반향으로 암호화에 필요한 걸 빈등록을해준다. 


그 후 configureGlobal을 하나 만들어준다. 

인증 처리에 관한 데이터 소스를 처리해준다.

이곳에 대해서는 나중에 many to many로 다대다 조인을 할 것이다. 


그 후 role 테이블을 만들어 이곳에는 인증에 대한 테이블이다

조인에 필요한 테이블을 생성해 준다.


테이블을 생성해 주었다면 모델 객체도 만들어주자


package com.seogi.myhome.model;

import lombok.Data;

import javax.persistence.*;
import java.util.List;

@Entity
@Data
public class Role {
    @Id
    @GeneratedValue(strategy = GenerationType.IDENTITY)
    private long id;
    private String name;

부트스트랩에서 로그인 페이지 샘플을 가져온다.


https://getbootstrap.com/docs/4.6/examples/


Examples

Quickly get a project started with any of our examples ranging from using parts of the framework to custom components and layouts.

getbootstrap.com

컨트롤러를 만들어 주어 로그인 페이지에 접근할 수 있도록 만들어준다. 


@GetMapping("/login")
public String loing(){
    return "account/login";
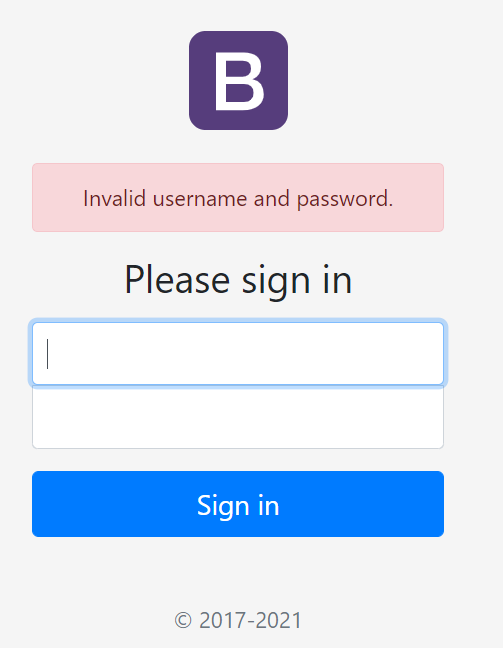
}

그 후 타임리프 th:if로 

<div th:if="${param.error}" class="alert alert-danger" role="alert">
    Invalid username and password.
</div>

</div>
<div th:if="${param.logout}" class="alert alert-light" role="alert">
    로그아웃 되었습니다.
</div>

에러를 처리해준다. 


이렇게 처리 되었다. 


그 후 로그인을 위해 회원가입 페이지를 만들어야겠다. 

회원가입 페이지는 간단하게 로그인 페이지를 카피하여 살짝 수정하여 재활용 하자 


페이지까지 만들었다면 

@ManyToMany 설정해준다. 


@ManyToMany
@JoinTable( name = "user_role", joinColumns = @JoinColumn(name = "user_id"),
inverseJoinColumns = @JoinColumn(name = "role_id")) // 조인될 상대 테이블을 적어준다.
private List<Role> roles = new ArrayList<>();
@ManyToMany(mappedBy = "roles")
private List<User> users;

이렇게 모델 객체에 추가하여준다. 

으로 조인해준다.


그 후 UserRepository를 만들어준다. 


package com.seogi.myhome.repository;

import com.seogi.myhome.model.Board;
import com.seogi.myhome.model.User;
import org.springframework.data.jpa.repository.JpaRepository;

public interface UserRepository extends JpaRepository<User,Long> {
}


JPA를 쓸 준비는 끝낫다. 


이제 컨트롤러를 작성해주자 


@GetMapping ("/register")
public String register(){
    return "account/register";
}

으로 접속 할 수있게 해주고 

그 후 서비스를 작성해주자


package com.seogi.myhome.service;

import com.seogi.myhome.model.Role;
import com.seogi.myhome.model.User;
import com.seogi.myhome.repository.UserRepository;
import org.springframework.beans.factory.annotation.Autowired;
import org.springframework.security.crypto.password.PasswordEncoder;
import org.springframework.stereotype.Service;

@Service
public class UserService {

    @Autowired
    private UserRepository userRepository;
    @Autowired
    private PasswordEncoder passwordEncoder;

        public User save(User user){
            String encodedPassword = passwordEncoder.encode(user.getPassword());
            user.setPassword(encodedPassword);
            user.setEnabled(true);
            Role role = new Role();
            role.setId(1);
            user.getRoles().add(role);
            return userRepository.save(user);
        }


}

서비스에서는 Repositoy를 사용하기 위해 

AutoWired로 추가해 준뒤 

아까 빈 등록을 해준 비밀번호 단방향 암호화를 해줄

@Autowired
private PasswordEncoder passwordEncoder;

이 두개를 AutoWired로 추가 해준다. 


Save()라는 메소드를 작성해준다. 

먼저 파라미터로 비밀번호를 받아와 passwordencoder로 암호화를 해준뒤 

유저 권한인 setEnabled를 true를 바꿔준다. 

그후 Role 객체를 추가 해준다. 

1번으로 설정 해준다. 


1번은 Role_user 로 권한을 설정해준다.


그후 

private List<Role> roles = new ArrayList<>();

아까 모델객체에서 추가해준 roles 를 ArrayList로 바꿔준다.


@PostMapping("/register")
public String register(User user){
    userService.save(user);
    return "redirect:/";
}

이제 컨트롤러를 완성시켜준다. 


<form class="form-signin" th:action="@{/account/register}" method="post">

    <a th:href="@{/}"><img  class="mb-4" src="https://getbootstrap.com/docs/4.6/assets/brand/bootstrap-solid.svg" alt="" width="72" height="72"></a>


    <h1 class="h3 mb-3 font-weight-normal">회원가입</h1>
    <label for="username" class="sr-only">UserName</label>
    <input type="text" id="username" class="form-control"  name="username"  required autofocus>
    <label for="inputPassword" class="sr-only">Password</label>
    <input type="password" id="inputPassword" class="form-control" name="password" required>
    <div class="checkbox mb-3">
    </div>
    <button class="btn btn-lg btn-primary btn-block" type="submit">Sign in</button>
    <p class="mt-5 mb-3 text-muted">&copy; 2017-2021</p>
</form>


이제 회원가입을 하면


이렇게 단방향으로 암호화가 되었다! 


잘 안된다면 아래의 소스코드를 확인해보자! 


https://github.com/MoonSeokHyun?tab=repositories 


MoonSeokHyun - Overview

http://mls0000.dothome.co.kr/. MoonSeokHyun has 7 repositories available. Follow their code on GitHub.

github.com


반응형
반응형

데드락(Deadlock, 교착 상태)이란?


데드락 

운영체제에서 데드락(교착상태)이란 시스템 자ㅣ원에 대한 요구가 뒤엉킨 상태


즉 둘 이상의 프로세스가 다른 프로세스가 ㅇ점유하고 있는 자원을 서로 기다릴때 무한 대기에 빠지는 상황


데드락의 발생 조건 


  • 상호 배제
    • 한 번에 프로세스 하나만 해당 자원을 사용할 수 있다. 사용 중인 자원을 다른 프로세스가 사용하려면 요청한 자원이 해제될 때까지 기다려야 한다.
  • 점유 대기
    • 자원을 최소한 하나 보유하고, 다른 프로세스에 할당된 자원을 점유하기 위해 대기하는 프로세스가 존재해야 한다.
  • 비선점
    • 이미 할당된 자원을 강제로 빼앗을 수 없다(비선점).
  • 순환 대기
    • 대기 프로세스의 집합이 순환 형태로 자원을 대기하고 있어야 한다.
  • 위 4가지 상활이 모두 발생 되어야 데드락이 걸린다.

데드락(Deadlock)의 해결법

데드락의 해결법을 크게 3가지로 분류할 수 있습니다.

  • 데드락이 발생하지 않도록 예방(prevention) 하기
  • 데드락 발생 가능성을 인정하면서도 적절하게 회피(avoidance) 하기
  • 데드락 발생을 허용하지만 데드락을 탐지(detection)하여, 데드락에서 회복하기
반응형
반응형

물리 메모리 크기의 한계를 극복하기 위해 나온 기술 


물리 메모리 보다 큰 프로세스를 수행하기 위해 사용


ex) 100MB 메모리 크기에서 200MB 프로세스를 어떻게 돌리는가? 


가상 메모리의 핵심은 필요한 부분만 메모리에 부분만 적재 하는것 


프로세스를 실행 할 떄 실행에 필효한 부분만 메모리에 올린다 .


참조 : 

https://velog.io/@syoung125/%EC%9A%B4%EC%98%81%EC%B2%B4%EC%9E%AC-%EA%B0%80%EC%83%81-%EB%A9%94%EB%AA%A8%EB%A6%AC%EB%9E%80


반응형
반응형

준비 큐에 있는 프로세스에 대해 cpu 할당 하는 방법


스케쥴링의 목적


스케쥴링의 목표에는 3가지 


1. cpu의 활용을 최대화

2. 평균 대기 시간의 최소화

3. 처리량의 최대화 


스켖쥴링은 멀티 프로세싱 운영체제를 디자인 하는 일과 컴퓨터의 멀티 테스킹 작업을 만들어 내는 데에 핵심 개념이다. 


스케줄링 알고리즘에는 무엇이 있나?

FCFS(First Come, First Served), SJF(Shortest Job First), Priority Scheduling, RR(Round Robin) Scheduling 등이 있다.


FCFS(처음온 것은 첫번째로 저장한다.) 


FCFS는 irst Come, First Served 의 약자이다. 즉 먼저온 사람 먼저 대접한다는 뜻으로 cpu를 처음 요구한 프로세스가 cpu를 처음ㅇ 사용한다는 의미의 시케쥴링 알고리즘이다. 


SJF 알고리즘은 무엇인가?


SJF는 Shortest job Frist 의 약자이다. 가장 시간이 적게 걸리는 작업을 먼저한다는 뜻으로 정의 는 cpu가 릴리즈 되어 있을때 가장 시간이 적게 걸리는 프로세스가 선택되어 실행된다는 것이다. 


Priority Scheduling 은 무엇인가?\


높은 우선순위를 가진 프로세스거ㅏ 항상 먼저 cpu를 사용할 수있도록 구현한다. 우선 순위 기반 스케줄링 에는 치명적인 단점 이슈가 있다. 굶주림이다. 우선순위가 낮은 프로세스는 영원히 작동하지 않을 수 있다.


Round Robin(RR) 스케줄링은 무엇인가?


Round Robin 스케줄링은 각각의 프로세스가 공평하게 시간 간격 동안 cpu를 활용 할 수 있도록 하는 스케줄링 알고리즘이다.


참고 https://thinkpro.tistory.com/122


[운영체제] CPU 스케줄러

Q. 스케줄러는 무엇이며, 스케줄링을 하는데 있어서 중요한 것은 무엇인가? 스케줄러는 레디 큐에 존재하는 프로세스들을 특정한 우선순위를 기반으로 CPU를 할당받게 해주는 역할을 한다. 스케

thinkpro.tistory.com


반응형
반응형

프로세스와 스레드의 차이 


프로세스 : 실행중인 프로그램

스레드 : 프로세스 안 실행 단위 


예를 들어 유튜브를 보고 있다고 생각해보자 


유튜브를 보면 

재생중인 유튜브 아래의 좋아요 버튼 이 하나하나가 스레드 이며

이것이 모이면 프로세스가 된다.


프로세스가 메모리에 올라 갈 떄 운영체제로 부터 시스템 자원을 할당받는다. 

이 때 운영체제는 프로세스마다 각각 독립된 메모리 영역 (코드/데이터/스택/힙) 형식으로 할당해 준다.

ㅂ각각 독립된 메모리 영역을 할당해 주기 때문에 프로세스는 다른 프로세스의 변수나 자료에 접근 할 수 없다. 


이와 다르게 스레드는 메모리를 서로 공유할 수 있다고 한다. 이에 대해 더 자세히 설명하자면 프로세스가 할당받은 메모리 영역 내에서 스택형식으로 할당된 메모리 영역은 따로 할당 받고 나머지 코드 /데이터/힙 형식으로 할당된 메모리를 공유한다. 따라서 각가의 스레드는 별도의 스택을 가지고 있지만 힙 메모리는 서로 읽고 쓸 수 있게 된다. 


참조 : https://velog.io/@raejoonee/%ED%94%84%EB%A1%9C%EC%84%B8%EC%8A%A4%EC%99%80-%EC%8A%A4%EB%A0%88%EB%93%9C%EC%9D%98-%EC%B0%A8%EC%9D%B4


프로세스와 스레드의 차이

프로세스와 스레드의 차이는 프로세스와 스레드, 그리고 프로그램이 작동하는 방식에 대해서 잘 이해하고 있는지 확인하기 위해 기술면접에서 단골 질문 사항으로 나온다.

velog.io


반응형
반응형

메모리의 구조? 


프로그램이 실행되기 위해서는 먼저 프로그램이 먼저 메모리에 로드되어야한다.

또한 프로그램에서 사용되는 병수들을 저장할 떄 메모리도 필요하다. 


따라서 컴퓨터의 운영체제는 프로그램의 실행을 위해 다양한 메모리 공간을 제공하고 있다.

프로그램이 운영체제로 부터 항당받는 대표적인 메모리공간은 4가지 이다.


1. 코드(CODE)

2. 데이터 (Data)

3. 스택(Stack) 

4. 힙 (Heap)


총 4가지의 영역이다. 


1. 코드 영역


메모리의 코드 영역은 실행할 프로그램의 코드가 저장되는 영역으로 텍스트 영역이라고도 부른다.

즉 cpu는 코드 영역에 저장된 명령어를 하나씩 가져가서 처리하게 된다. 


2. 데이터 영역


메모리의 데이터 영역은 프로그램의 전역변수와 정적(static) 변수가 저장되는 영역이다.

데이터 영역은 프로그램의 시작과 함께 할당되며 프로그램이 종료되면 소멸한다. 


3. 스택 영역


메모리의 스택 영역은 함수의 호출과 관계 되는 지역 변수와 매개변수가 저장되는 영역이다. 

스택 여역은 함수의 호출과 함께 할당되며 함수의 호출이 완료되면 소멸한다.

이렇게 스택 영역에 저장되는 함수의ㅏ 호출 정보를 스택프라임  이라고 부른다. 


4. 힙 영역


메모리의 힙 영역은 사용자가 직접 관리 할 수 있는 그리고 해야만 하는 메모리 영역 이다. 

힙 영역은 사용자에 의해 메모리 공간이 동적으로 할당되고 해제 된다.

힙영역은 메모리의 낮은 주소에서 높은 주소의 방향으로 할당된다. 


반응형
반응형

운영체제란?

운영체제는 컴퓨터 시스템의 자원들을 효율적으로 관리하며 사용자가 컴퓨터를 편리하고 효과적으로 사용할 수있도록 환경을 제공하는 여러 프로그램의 모임이다. 운영체제는 컴퓨터의 사용자와 컴퓨터 하드웨어 간의 인터페이스로써 동작하는 시스템 소프트웨어의 일종으로 다른 응용프로그램이 유용한 작업을 합수 있도록 환경을 제공한다. 


즉 

시스템의 자원과 동작을 관리하는 소프트 웨어

프로세스 저장 장치 및 네트워킹 사용자 하드웨어를 관리한다. 


반응형
반응형

우선 간단한 게시판을 만들고 있는데

이전에 배운 validation 체크를 해보려고 한다. 

방법은 매우 간단다하다. 


우선 부트스트랩 기능을 적극 이용할 예정이다. 


벨리데이션체크하는 방법은 

크게 두가지가 있는데 

 
첫번째는 model 객체에 vaild를 사용하여

@Size 등 어노테이션을 이용하는 것이다. 


@Id
@GeneratedValue(strategy = GenerationType.IDENTITY)
private long id;
@NotNull
@Size(min = 2,max = 30 , message = "제목은 2자이상 30자 이하 입니다.")
private String title;
@NotNull
@Size(min = 1, message = "내용을 입력해주세요.")
private String content;


한다면 이와 같이 정의 할 수 있다. 


 <div class="form-group">
          <label for="title">제목</label>
          <input type="text"  class="form-control"  th:classappend="${#fields.hasErrors('title')} ? 'is-invalid'" id="title" th:field="*{title}" >
          <div class="invalid-feedback" th:if="${#fields.hasErrors('title')}" th:errors="*{title}">
            제목 에러메시지
          </div>
        </div>
        <div class="form-group">
          <label for="content">내용</label>
          <textarea class="form-control"  id="content" rows="3" th:field="*{content}"  th:classappend="${#fields.hasErrors('content')} ? 'is-invalid'"></textarea>
          <div class="invalid-feedback" th:if="${#fields.hasErrors('content')}" th:errors="*{content}">
            내용 에러메시지
          </div>


그 후 타임리프 th:if ="fields.haserrors"로에러가 있다면 에러 메시지를 반환한다.


보시다시피 #fields.hasErrors(...) 함수는 매개변수(datePlanted)로 필드 표현식을 수신하고 해당 필드에 유효성 검사 오류가 있는지 여부를 알려주는 부울 값을 반환합니다. 또한 해당 필드에 대한 모든 오류를 얻고 반복할 수 있습니다.

타임리프 공식홈페이지 발췌 


그 classAppend로 클래스를  추가해 준다. 


is-invalid

추가해 주면 된다.


두번째 방법을 알아보자 


import org.thymeleaf.util.StringUtils;

@Component
public class BoardVaildator implements Validator{

    @Override
    public boolean supports(Class<?> clazz) {
        return Board.class.equals(clazz);
    }

    @Override
    public void validate(Object target, Errors errors) {
        Board board = new Board();
        if(StringUtils.isEmpty(board.getContent())){
            errors.rejectValue("content", "key" ,"내용을 입력하세요");
        }

    }
}

이 방법은 벨리데이션 메소드를 만들어 서비스와 같이 동작을 하게된다. 


    @PostMapping("/form")
    public String greetingSubmit(@Valid Board board, BindingResult bindingResult){
//        vaildator.validate(board,bindingResult);
        if(bindingResult.hasErrors()){
            return "board/form";
        }
        boardRepository.save(board);
        return "redirect:/board/list";
    }
}

form에 전달될때 validator로 검증을 하면 위와 같이 동작한다. 


1번의 경우는 간단하지만 세밀한 조정이 어렵다.

2번 같은경우는 세밀한 조정이 가능하지만 클래스를 하나 더 만들어야 한다. 


https://github.com/MoonSeokHyun/SpringBoot

반응형

+ Recent posts